
Engineering & Planning
Is a Louvered Pergola Waterproof?
Understand how a louvered pergola manages rain, where water travels, why wind-driven rain and interfaces matter, and what to verify before buying.
DIRECT ANSWER
Is a louvered pergola completely waterproof?
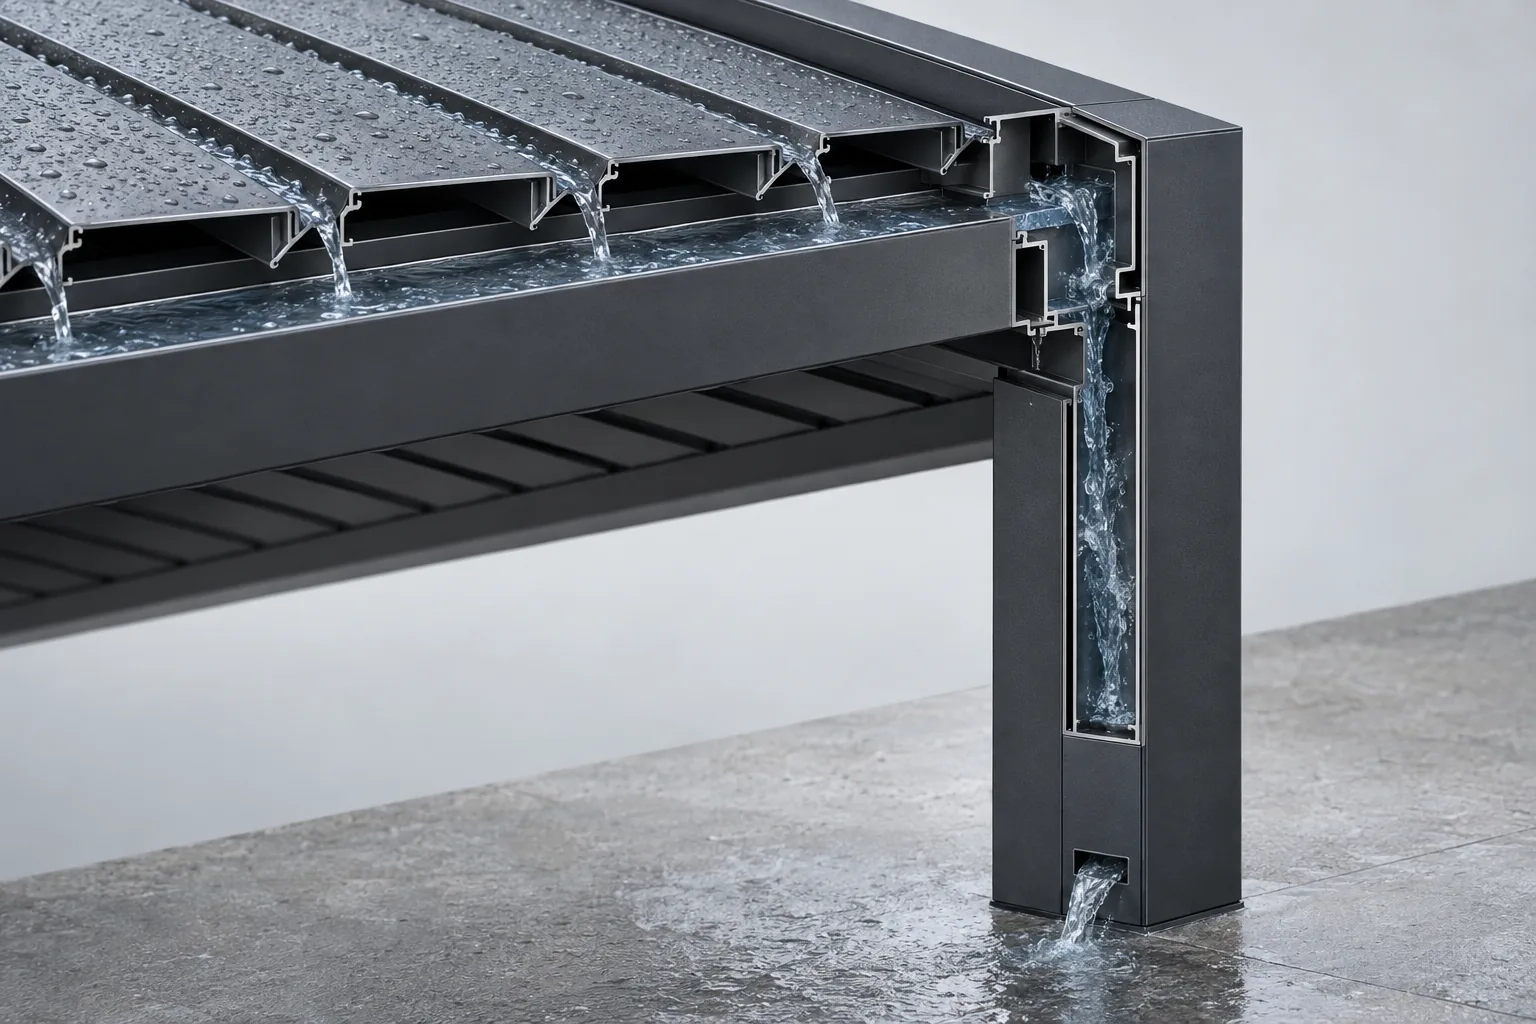
A louvered pergola should not be described as universally or completely waterproof. In a compatible rain-management configuration, closed louvers can overlap and guide water toward perimeter channels, outlets and a planned discharge route. The result still depends on the selected system, roof pitch and geometry, interfaces, installation, maintenance, rainfall, wind direction and drainage capacity. Open sides remain exposed to wind-driven rain. Ask for the exact water path, operating limits and installation details for the proposed model instead of relying on the word waterproof alone.
KEY TAKEAWAYS
The working principles in brief
- Closed louvers, gutters, outlets and discharge points work as one path.
- Wind-driven rain can enter through open sides and roof interfaces.
- A rain claim must be tied to a defined model, configuration and condition.
- Maintenance access is part of drainage performance.
WHO THIS GUIDE IS FOR
Use this guide to frame the right project questions.
- Buyer comparing waterproof and rain-resistant pergola claims
- Designer coordinating roof water with the site
- Operator planning inspection and cleaning access
Replace the word waterproof with a defined performance question
Waterproof can mean several different things to different buyers. One person may expect the occupied area to stay comfortable during a brief vertical shower; another may expect dry furniture during wind-driven rain; a restaurant operator may be concerned about water reaching a doorway or electrical equipment. Those are not the same test. Begin by describing the rain condition, the sides that remain open, the acceptable result and the operating position of the roof. Then ask the supplier to explain what the selected configuration is intended to do. This turns a vague promise into a reviewable project requirement and prevents a showroom demonstration from being treated as proof for every site, exposure and installation.
Follow the complete water path from louver to discharge
When the selected roof is configured for rain management, the closed blades form the first part of a sequence. Water is directed toward collection channels, transferred into perimeter gutters or beam cavities, routed to outlets and carried toward a site discharge point. Every transition matters. A roof can collect water successfully while the project still fails because an outlet is blocked, a connection is incomplete or discharge reaches a walking surface. Request a simple section or diagram that identifies collection edges, beam channels, post routes, outlets and the final site connection. Keep the manufacturer system, installer work and site drainage responsibilities separate so an unresolved boundary is not hidden inside a general statement about integrated drainage.
Roof interfaces are different from the center of a blade
Rain behavior at a broad roof surface is only one part of the review. Module joints, perimeter beams, motor or linkage zones, wall connections, penetrations and transitions beside existing construction can create different paths. A wall-mounted arrangement also needs a coordinated building interface; the pergola roof does not automatically repair an unsuitable wall, flashing detail or waterproofing condition. Ask which interfaces are factory-prepared and which are completed locally. On connected modules, request the intended treatment of the shared line. The project team should be able to point to each junction on the drawing and state how water is collected, diverted or kept away from vulnerable construction without inventing a generic sealant solution after installation.
Separate overhead rain from wind-driven rain at open sides
A pergola can manage water arriving on the roof and still receive rain through an open side. Wind changes the direction of droplets, and local turbulence around buildings can make exposure different from a simple weather report. Side screens, glass or louver panels may reduce some exposure when they are compatible, but they do not turn an outdoor structure into a universally sealed room. They also change wind load, openings, controls and escape or circulation conditions. Mark the prevailing exposed sides and the occupied zones that matter most. If a buyer needs interior-like dryness, that requirement may indicate a different building enclosure strategy rather than a stronger adjective for an open pergola.

Drainage capacity cannot be inferred from appearance
Two roofs with similar photographs may use different channel dimensions, outlet arrangements and allowable module layouts. Capacity also depends on how the project divides water between outlets and where those outlets discharge. Do not calculate or approve capacity from a marketing image, and do not assume that adding a larger downpipe solves an upstream restriction. Provide the project location, roof layout and applicable rainfall design information to the responsible project professionals. Ask the supplier what verified information is available for the specific model. The final site drainage design, including connections beyond the supplied system, must follow the local requirements and the actual supporting construction.
Operating position and controls affect the rain response
An adjustable roof cannot manage rain in the same way while it is open. Define who closes the roof, how the controls are accessed and what happens if power or communication is unavailable. A sensor may support an operating strategy where compatible, but it is not a substitute for confirmed product limits, commissioning or responsible supervision. The selected instructions should explain permitted operation and any conditions in which movement should stop. For commercial spaces, make the routine understandable to staff instead of leaving it with one person. If equipment, furniture or stock depends on the roof position, plan a conservative operational response and do not treat automation as a guarantee against changing weather.
Cleaning and inspection keep the intended path available
Leaves, dust, seed pods and construction debris can occupy channels or outlets. The useful maintenance question is not whether aluminum is low maintenance, but how a person safely sees and reaches the collection path for this configuration. Obtain the product care instructions, identify inspection points and set a schedule around local trees, dust, storms and operating intensity. Do not probe concealed mechanisms or alter drainage components without the relevant documentation. Record staining, slow discharge, unusual overflow and the roof position when the observation occurred. A clear service record helps distinguish a blocked outlet from an interface, installation or capacity issue.
Make rain management visible in the quotation and drawings
A useful quotation names the roof model, module arrangement, supplied drainage components, outlet positions, excluded site work and information still requiring confirmation. The coordinated drawing should show the intended water route and final connection responsibility. Ask what documentation will be provided for installation, commissioning and maintenance. Compare proposals using the same rain brief instead of accepting different uses of waterproof. If one proposal excludes wall interfaces or below-ground drainage, that exclusion may be legitimate, but it must remain visible in the decision. The goal is a complete responsibility map, not a promise that one component can control every form of water around an outdoor structure.
At handover, photograph the accessible drainage points, record the expected inspection routine and keep the approved drawings with the product instructions. A future owner or service team should be able to understand where water is intended to travel without reverse-engineering the structure. This small documentation step turns rain management from a sales phrase into an identifiable system that can be observed, maintained and discussed when conditions change.
COMPARISON
Rain questions to separate during project review.
Use this table to structure a discussion, not as project approval.
| Question | What to verify | Why it matters |
|---|---|---|
| Roof collection | Closed-louver overlap and collection direction | Defines the first part of the path |
| Internal transfer | Channels, gutters, outlets and module joints | Identifies restrictions and interfaces |
| Site discharge | Connection point and responsible trade | Keeps water away from occupied or vulnerable areas |
| Side exposure | Wind direction, screens and open edges | Separates overhead rain from wind-driven rain |
| Maintenance | Inspection access and care instructions | Keeps the intended drainage route available |
PROJECT CHECKLIST
Information to prepare
- Define the rain condition and acceptable occupied-area result.
- Request the water path from blades to the site discharge point.
- Mark module joints, wall interfaces and penetrations on the drawing.
- Identify open sides exposed to wind-driven rain.
- Confirm outlet positions and responsibility for final connections.
- Review controls, operating instructions and loss-of-power planning.
- Keep gutters and outlets accessible for inspection and cleaning.
- List performance assumptions and exclusions in the quotation.
COMMON PLANNING MISTAKES
Assumptions to avoid
- Treating waterproof as a universal yes-or-no product label.
- Reviewing the roof center but not module and building interfaces.
- Ignoring side rain because the louvers close overhead.
- Leaving the final discharge route to be decided after installation.
- Assuming a rain sensor guarantees protection in every condition.
FAQ
Questions about is a louvered pergola waterproof
Do louvered pergolas leak?+
A properly configured roof may manage rain through closed louvers and coordinated drainage, but water can still enter through open sides or unresolved interfaces. Leakage concerns must be diagnosed by location, weather condition, roof position, installation and maintenance state.
Can furniture stay outside under a louvered pergola?+
That depends on the furniture, site exposure, open sides, operating routine and the verified rain performance of the selected system. Do not use a generic roof claim as a storage guarantee for moisture-sensitive items.
Where does water go on a louvered pergola?+
In a rain-management configuration, water is typically directed from roof elements into collection channels and outlets, then toward a planned site discharge. Exact routing depends on the model and project.
Do side screens make a pergola waterproof?+
No. Compatible screens can help manage some side exposure, shade and privacy, but they do not create a universally sealed room and may introduce additional structural, control and access considerations.
Why does a pergola overflow in heavy rain?+
Possible causes include blocked paths, unsuitable outlet or connection conditions, installation issues, unusual exposure or a demand beyond the reviewed configuration. Document the condition and obtain a project-specific inspection instead of guessing.
What should a rain-performance quote include?+
It should identify the model, module layout, supplied drainage components, outlet positions, interfaces, operating assumptions, excluded site work and the party responsible for each final connection.
SOURCES AND FURTHER READING
NEXT STEP
Review your rain-management plan
Share the location, roof layout, open sides and intended discharge route for a project-specific configuration review.
Review your rain-management plan